Programming with asyncframes
Frame Hierarchy Model vs. Object Oriented Programming
The most common form of Object Oriented Programming (OOP) is class-oriented programming. In this form programs are designed using classes and objects. A class defines the structure of a conceptual entity. After a class is defined, the programmer can create one or more objects of that entity. These objects are also known as instances of the class.
The state and behavior of objects are defined within the class by creating variables and methods respectively. Different objects of the same class can contain different data (i.e. values), but their state (i.e. variables) and behavior (i.e. methods) are the same. Dynamic languages, like Python, allow manipulation of state and behavior at runtime.
In the Frame Hierarchy Model (FHM) programs are designed using frame classes, frame instances and frames. The frame class defines static state and behavior, similar to the class in OOP. The frame defines dynamic state and behavior, that is specific to a single instance of a frame class. After a frame is defined, the programmer can create one or more frame instances of it, similar to objects in OOP.
Any class deriving from one of the fundamental frame classes Frame, PFrame or DFrame is by definition a frame class. Frame instances are created by instantiating frames and frames are created by instantiating frames classes. Frames can be created without any general state or behavior by directly instantiating one of the fundamental frame classes.
class ButtonFrame(asyncframes.Frame):
    """An example frame class."""

@ButtonFrame
async def button_frame():
    """An example frame."""

@Frame
async def helper_frame():
    """An example frame without a frame class."""

button = button_frame(): # An example frame instance.
Note
The differences between Frame, PFrame and DFrame are explained in chapter Parallel Programming with asyncframes.
In a way, FHM adds another layer between classes and objects. The additional third layer may seem to add complexity to the programming model, but it can be strictly separated by the following principle:
Tip
State and behavior that is general enough to be applicable to different programs should be defined via frame classes. State and behavior that is specific to a single program should be defined via frames.
Ideally most frame classes should be defined in separate Python packages, so they can be reused across projects (see examples/frame_libraries in the git repository).
Example
To illustrate the differences between frame classes, frame instances and frames, let’s consider a simple use case:
We would like to create a button in a user interface that prints the line “Hello World!” when clicked.
Creating frame classes for Gtk.Window and Gtk.Button
First we create a frame class that represents a GTK window:
1 2 3 4 5 6 7 8 | class GtkFrame(FrameMeta, type(GObject)):
pass
class Window(Frame, Gtk.Window, metaclass=GtkFrame):
def __init__(self, *args, **kwargs):
Frame.__init__(self)
Gtk.Window.__init__(self, *args, **kwargs)
self.connect("destroy", lambda _: self.remove())
|
The class Window is a frame class because it derives from asyncframes.Frame. In line 8, we connect the window’s destroy event to the asyncframes.Awaitable.remove() method. This will remove the frame when the user closes the window. The rest of this code snippet is required to enable multiple inheritance in Python:
Lines 1 and 2 declare a metaclass that derives from both the metaclass of Frame (i.e. FrameMeta) and Gtk.Window (i.e. type(GObject)).
Lines 6 and 7 call the constructors of both base classes. Note that we are pass through any arguments of the window frame class to the GTK window. We will use this later to pass a title string to the window.
Now let’s create another frame class for buttons:
1 2 3 4 5 6 7 8 9 10 | class Button(Frame, Gtk.Button, metaclass=GtkFrame):
def __init__(self, *args, **kwargs):
Frame.__init__(self)
Gtk.Button.__init__(self, *args, **kwargs)
find_parent(Window).add(self)
self.clicked = Event("Button.clicked")
def send_clicked_event(*args):
self.clicked.send(args)
self.connect("clicked", send_clicked_event)
|
The Button frame class derives from both Frame and Gtk.Button. After calling the constructors of both base classes, we add the button to its window. Remember that any FHM program consists of a hierarchy of frames. To find the window this button belongs to, we use the function asyncframes.find_parent(parenttype) to search the hierarchy for the closest ancestor of type Window. Finally, in lines 7 through 10, we create an asyncframes.Event and connect it to the clicked event of the GTK button.
Creating a FHM program using Window and Button
Let’s use Window and Button frame classes to create a simple GUI application:
1 2 3 4 5 6 7 8 9 10 11 12 13 14 15 16 17 | @Window(title="Button Example")
async def main_frame(self):
@Button("Click Here")
async def button_frame(self):
self.show()
while True:
await self.clicked
print("Hello World!")
button = button_frame()
self.set_default_size(280, 40)
self.set_border_width(8)
self.show()
await hold()
loop = glib_eventloop.EventLoop()
loop.run(main_frame)
|
We start by creating a main frame of type Window in lines 1 and 2. Since our Window frame class is forwarding all arguments to the underlying Gtk.Window, we can pass the window title when creating the frame. The self argument is optional in asyncframes. It refers to the frame just like the self argument on a Python method.
In lines 11 to 13 we use self to call methods of the Gtk.Window. Line 11 resizes the window, line 12 adds padding around our button and line 13 displays the window.
Line 14 is important to keep the main_frame from going out of scope. Frame classes are removed when they go out of scope and the window is part of our main_frame. Accordingly, without await hold() our application would close the window and exit immediately.
Note
await hold() is semantically equivalent to await sleep(sys.float_info.max)
The last thing to define is our button. FHM allows us to create the button and define its entire life cycle in a single block of code (lines 3 to 9). If we were to completely remove all code related this button in the future, we would only need to remove or comment-out these lines. Lines 3 to 8 define the button frame and line 9 creates a frame instance.
Note
We define button_frame inside main_frame to emphasize that this button is a child of the window in the frame hierarchy. This is not a requirement. The button’s position in the hierarchy only depends on where the frame instance is created (line 9). Accordingly, it wouldn’t affect the application if we defined button_frame outside main_frame.
Similar to the window title, we pass the button text as an argument when creating the button frame (line 3).
Lines 5 to 8 define the behavior of the button. In our case we start by making the button visible (line 5) and then we print “Hello World!” (line 8) every time (line 6) the button is clicked (line 7).
Running the example
To run an FHM application that uses GTK, we need to invoke the main frame from an eventloop that is implemented on top of the GLib event system:
1 2 | loop = glib_eventloop.EventLoop()
loop.run(main_frame)
|
This example requires asyncframes and GTK for Python:
pip install asyncframes pygobject
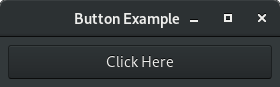
The created window will look like this:
Whenever the button is pressed, “Hello World!” will be displayed in the output terminal or console.